
Role-based account
Role-based account
A role-based account (“Funktionskonto”) is a user account that is not assigned to an individual person, but to an organisational unit, a project or a function. This enables, for example, to have email addresses such as projectname@uol.de or institutename@uol.de with their own separate email inbox.
What you can do with it
- Emails received in a role-based account can be forwarded to several people.
- Multiple people can use the role-based account simultaneously, e. g. open the email inbox at the same time.
- If the person responsible for a role-based account is out of office, another person can be authorised to access the email inbox on their behalf.
- Role-based accounts have access to services such as cloud storage/Nextcloud.
What is not possible
- Role-based accounts do not have “Lecturer” status in Stud.IP and are therefore unable to create or moderate mailing lists.
- Role-based accounts cannot use “Eduroam” Wi-Fi, because they are not connected to the DFN-AAI infrastructure (authentication and authorization infrastructure of the Deutsches Forschungsnetz).
- By default, there is also no Wi-Fi access for role-based accounts on the university campus. If you do require Wi-Fi access for your role-based account, you must explicitly apply for it already when you submitting the application for the account.
- Role-based accounts cannot download software that is licensed for individual use
- Role-based accounts do not have access to the library’s personalised services.
Requesting a role-based account
The application for a role-based account follows an automated workflow:
Requesting a role-based account (The interface is currently only available in German)
Further enquiries about role-based accounts may be addressed via email to:
Validity of role-based accounts
Duration
Role-based accounts are deleted after 180 days of non-use. You will receive an email one month in advance, informing you about the imminent deletion of the role-based account. By replying to that e-mail, you will be given the opportunity to delay the deletion for a further 180 days. Only if you do not reply within one month will the role-based account and all its contents be irrevocably deleted.
Assignment to a person
A role-based account always needs an assigned responsible person who is in a current employment relationship with the university. Employees who will soon be leaving the university will receive an information that lists the role-based accounts for which they are responsible and be advised that a new responsible person must be assigned to these role-based account(s). If no such handover takes place, the role-based account will be deactivated and later deleted.
How do I enable access to my role-based account in Outlook?
Outlook desktop application
These instructions are intended to help you set up or switch your account yourself.
We need to distinguish between two scenarios:
Scenario 1: The email address of the role-based account is already set up in your operating system with login credentials.
Scenario 2: The email address of the role-based account is not yet set up in your operating system.
Please check yourself whether the email address is already set up (Scenario 1) or not (Scenario 2).
Scenario 1: The email address of the role-based account is already set up in your operating system with login credentials.
First, please check whether the login credentials of the role-based accoount are already registered in your operating system. To do so, follow the steps detailed below. If the login data is indeed registered already, you first need to delete them as described below. Only then can you proceed with the automated set-up as described under scenario 2.
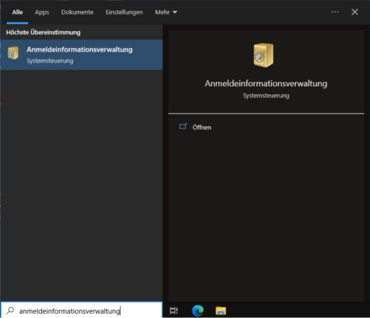
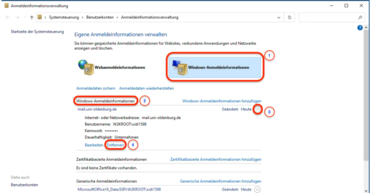
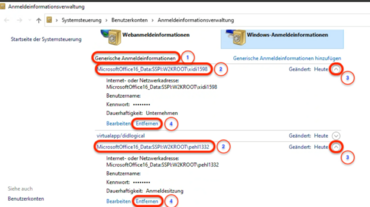
Scenario 2: The email address of the role-based account is not yet set up in your operating system.
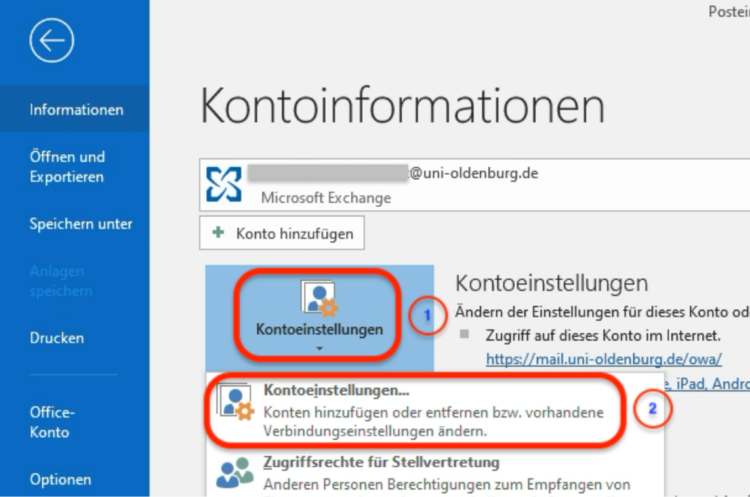
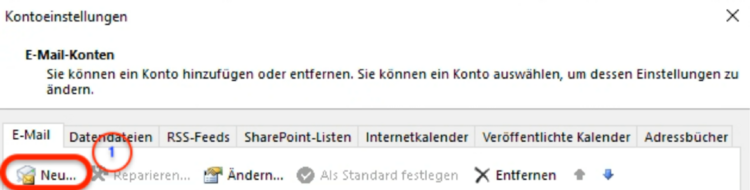
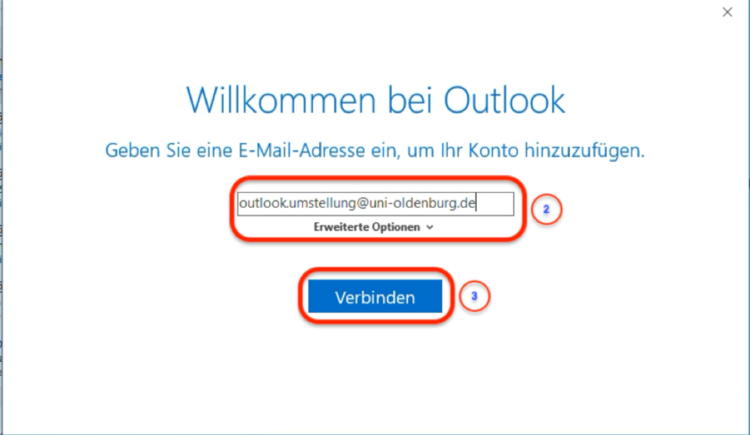

Outlook Web App (OWA)


I use several role-based accounts – how do I access them all?
To access role-based accounts, you first need the relevant authorisation. The person responsible for a role-based account can grant you the necessary authorisation. If you are the responsible person, you automatically have authorisation for that account.
You can set up Outlook email access for role-based accounts yourself – either in the desktop app or in the Outlook web app (OWA). You do not need the password of the role-based account to set up email access; you only need its full email address (e.g. role-name@uni-oldenburg.de).
You can set up several role-based accounts in Outlook in parallel. This gives you simultaneous access to your personal mailbox as well as the mailboxes of the role-based accounts.
To find out how to access not only emails but also other functions of the role-based account (e.g. cloud storage or StudIP), please refer to the section on two-factor authentication below.
How can I set permissions for a role-based account?
You can set the permissions for a role-based account yourself via the self-service portal. It is currently only available in German, but you can follow this step-by-step explanation:
- Open the self-service portal.
- Select “Anwendung” (application) in the top menu.
- An overview of various functions will open (see image below).
- Under the heading “Nutzerkonten” (user accounts), select the tile “Berechtigte für FKT-Konto” (Authorised users for role-based account).
- This will open the settings for role-based accounts.
- Now, select the respective role-based account – this is only possible if you are assigned as its responsible person.
- Here you can add or remove other authorised users for the selected role-based account. The selected users will then get access to the role-based account’s email inbox and can use two-factor authentication for the role-based account.

How can I request to manage a role-based account?
You can request manager rights for a role-based account via the self-service portal. It is currently only available in German, but you can follow this step-by-step explanation:
- Open the self-service portal.
- Select “Anwendung” (application) in the top menu.
- An overview of various functions will open (see image below).
- Under the heading “Nutzerkonten” (user accounts), select the tile “Berechtigte für FKT-Konto” (Authorised users for role-based account).
- This will open the settings for role-based accounts.
- At the bottom of this page, select “Verwaltung eines anderen Funktionskontos anfragen” (request administration of another role-based account).
- You can now use the search function to find the required role-based account and request admin rights for it.
How can I transfer responsibility for a functional account to another person?
Would you like to fully transfer responsibility for a role-based account to another person?
This setup is possible via the self-service portal, which is currently only available in German. But you can follow this step-by-step explanation:
- Open the self-service portal.
- Select “Anwendung” (application) in the top menu.
- An overview of various functions will open (see image below).
- Under the heading “Nutzerkonten” (user accounts), select the tile “Meine Nutzerkonten” (My user accounts).
- The page “Meine Nutzerkonten verwalten” (Manage my user accounts) will open. There, you can select the espective role-based account and the person to whom you want to hand over management rights for the role-based account.
- In doing so, you will lose both responsibility for and access to the functional account.
If you wish to retain access to the functional account, the new responsible person must grant you authorisation again.
Would you like to grant another person access to the role-based account, while keeping the status as responsible person yourself?
You have two options to achieve this:
- Either you add the other person in the settings for the role-based account. To do so, you must be the responsible person for the role-based account.
- Or the other person can themself request admin rights for the role-based account. This request must in turn be approved by the current responsible person.
Special handling of two-factor authentication (2FA) for functional accounts
Just as with individual university accounts, 2FA provides additional protection for functional accounts too. The following sections describe how 2FA is used specifically with functional accounts and what you need to bear in mind. General information on two-factor authentication can be found on the relevant information page.
What does the login process look like for for role-based accounts using 2FA?
Visually, the login process for role-based accounts looks exactly the same as you are already familiar with from you personal account. However, there is one technical difference:
- First, you must enter the login credentials for the role-based account, specifically the account name and password.
- You must then also enter your personal second factor. For role-based accounts, you must use a one-time password (“TOTP”) as a second factor; a “YubiKey” (FIDO2) cannot be used. You can find out how to set up this second factor in the next section.
If you only wish to access the email inbox of a role-based account, you do not need a second factor. 2FA is only required to log into other services such as cloud storage or StudIP. Consequently, it may be the case that only the role-based account’s responsible person knows the respective password and has linked their second factor to the role-based account.
Setting up 2FA for a role-based account
Each role-based account that you want to access needs to be paired with the second factor of your personal account. This needs to be done by the responsible person of the role-based account. Since October 2026, that setup can be made via the self-service portal, as explained in the section above.
Before your personal second factor can be paired with the role-based account, you first need to set it up for your personal account (only if you haven't done so already). Please refer to the 2FA info page for the instructions.
However, for technical reasons there is one caveat: You cannot use a Yubikey (FIDO2) as a second factor as per usual. Instead, you have to use the one-time password (“TOTP”) function via an app or set up a dedicated TOTP process for your Yubikey:
Using the YubiKey to log into role-based accounts
If you do not have a mobile device, you can alternatively set up a one-time password process using your Yubikey instead. The Yubikey supports time-based one-time passwords (TOTP). To use it, you will need the Yubico Authenticator app. First, you must set up the one-time password method as explained below. After this initial step, regularly using it is very straightforward, as explained in the final section.
Setting up 2FA with Yubico Authenticator
Install and launch Yubico Authenticator
- You can find and install the Yubico Authenticator desktop application via the Software Kiosk, if your device is managed within the University of Oldenburg’s Windows domain. If you are using a self-managed device, you can download the app from the Yubikey manufacturer’s website.
- Launch Yubico Authenticator.
- Plug your YubiKey into a USB port on your device. (If your device supports NFC, simply place the YubiKey on top of it.) The app will recognise the YubiKey automatically.
- Leave the app open while you proceed with the next steps.
Setting up the login method via one-time password (TOTP)
- Now, open the University of Oldenburg’s 2FA portal separately in a browser window and log in. Use the login credentials for your personal university account!
- On the homepage of the 2FA portal, select the “+” button.
- You will now see a selection of “Available Methods for Enrollment”. Select the “One Time Password (TOTP)” option.
- An input form will open (see image below; click to enlarge); please fill it in as follows:
- Display Name: You can keep the suggested name for the TOTP method or choose any other name.
- Category: Select “Standard” if you are setting up a one-time password for the first time. If you are setting up a second one-time password, “2ND_Token” will appear here.
- Service Name: Enter “Universität Oldenburg”.
- Account Name: Enter your personal account name, which consists of 4 letters and 4 numbers.
- “OATH token”: Leave this field exactly as it is.
- Now, select the “Manual TOTP” button at the bottom, which will expand the corresponding section.
- A flied labelled “Secret” will appear. Tap the padlock icon next to the field. This will reveal the secret key.
- Highlight the secret key and copy it. Now make sure you proceed straight away with the next step in the Yubico Authenticator app. Do not accidentally paste the secret key anywhere else – only into the Yubico Authenticator!

Transferring the secret key to Yubico Authenticator
- Switch back to the Yubico Authenticator app.
- Select “Accounts” in the left-hand menu.
- Now select “Add account” in the top right corner.
- An input form will open (see image below). Fill in the form as follows:
- Issuer: Enter “Universität Oldenburg”.
- Account name: Enter your personal account name, which consists of 4 letters and 4 numbers.
- Secret key: Enter the secret key that you copied earlier from the 2FA portal.
- Confirm with “Save”.
- Now return to the 2FA portal. Select “Save” there as well to complete the setup. You can now use the one-time password login method, as described in the next section.

Using 2FA with Yubico Authenticator
If you are logging into your personal university account or a role-based account using the one-time password method, proceed as follows:
- During the log-in process, for example in your browser, the service will ask for a 6-digit code.
- Plug the YubiKey into your computer.
- Open the Yubico Authenticator app.
- The 6-digit code will be displayed in the app.
- Copy the code or memorise it.
- Return to the login window, paste the code there and confirm.
- Please note: The code changes every 30 seconds – this is part of the security protocol. (Tip: a code that has just expired would still be valid for a few seconds, as there is a short timeframe for tolerance).