Cloud-Storage

Cloud-Storage: your personal data storage

The data service Cloud-Storage enables you to mirror a local directory on your end device to the university's data storage system and to keep it synchronized in the background. The synchronization works not only with one, but with any number of end devices, so that you can use the service not only for data backup but also for the synchronization of your data between your end devices. You can also make the synchronized directory or parts of it available to individual users for reading or writing.

In contrast to the Dropbox Internet service, for example, Cloud-Storage has all the systems required to provide the service on the university campus and is only supervised and operated by university staff.

Access to the service is possible for end devices of the common platforms. You can also access your database using a web browser.

After setting up the sync client on your device, selected parts of your database are automatically synchronized with the university's data management system.

You can restore files that were accidentally deleted within the Cloud-Storage service yourself.

You can use this service to share files with other university users and external third parties.

You can reach the service atcloud.uol.de.

Please note that you must first activate this service feature for your account. For a description of how to activate, see Activating the Service for Your Account.

Data protection

(Only the German version is legally approved)

Logging

Log files are created for the purpose of filtering.

A record in the log file is always generated when you access the service.

Log record

A data record consists of a time stamp, your IP address, your user name, the command, the file called up, the transmission size and a status code.

Log retention period

The log records are stored for a maximum of 7 days.

Data storage

Your data is stored in the service on the central storage systems of the University of Oldenburg. The data is saved in individual user directories.

Synchronized directories are saved on the local end devices with their local security architecture.

Data transfer

The data transfer from a client or web browser to Cloud-Storage service takes place exclusively via encrypted communication channels.

The strength of the encryption depends on the end devices used. As a rule, procedures with "Perfect Forward Secrecy" are used, which make subsequent decoding of the data stream difficult.

Privacy information for Nextcloud Talk

The entire chat content data of a group conversation can be deleted at any time by a moderator of a group conversation. There can be multiple moderators for a group conversation. It is recommended that you use this delete function. As soon as the last participant leaves a one-to-one conversation, the chat content data is automatically deleted. Voice and video data is only temporarily buffered on the participating user devices. There is no persistent storage or recording of voice and video conferences by Nextcloud Talk on the end devices of participating persons.

The data transmission to the cloud storage as well as the transmission of video and audio data between the end devices is encrypted (transport encryption).

Saving of video or audio conferences is excluded. Log data on the system side is automatically deleted after seven days at the latest.

Activation of the service for your account

Before you can start using Cloud-Storage, you must first activate your account for this service feature.

By activating, you agree to the publication of your university email address within Cloud-Storage service. Other users can search for your email address and share data with you. It is not possible to use the service without publishing your email address.

To activate Cloud-Storage service feature, proceed as follows:

1. Log on to the page here with your personal access data.

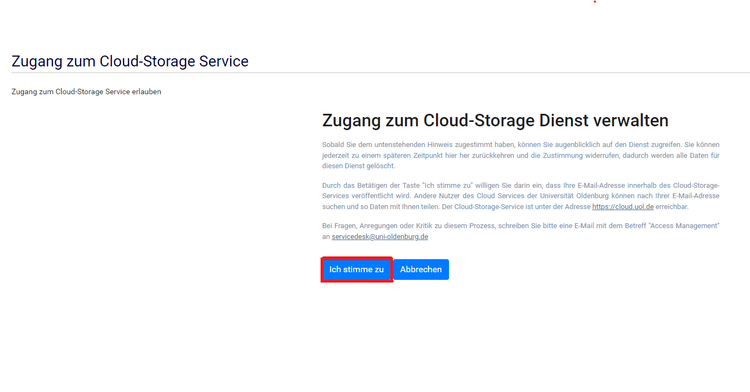
2. Click on the tile "Zugang zum Cloud-Storage Service".

3. Read the text carefully. If you agree to the terms, confirm with "I agree".

4. Click on your name on the top right and exit the application via "Logout".


You can withdraw your consent in the same way. To do this, select "Revoke consent" in point 2.

Web interface: Store and share files in cloud storage

Using Cloud-Storage

The following chapter introduces you to the use of the Cloud-Storage service.

Web Interface

Cloud-Storage has a web interface through which users can access their data and share it with other users.

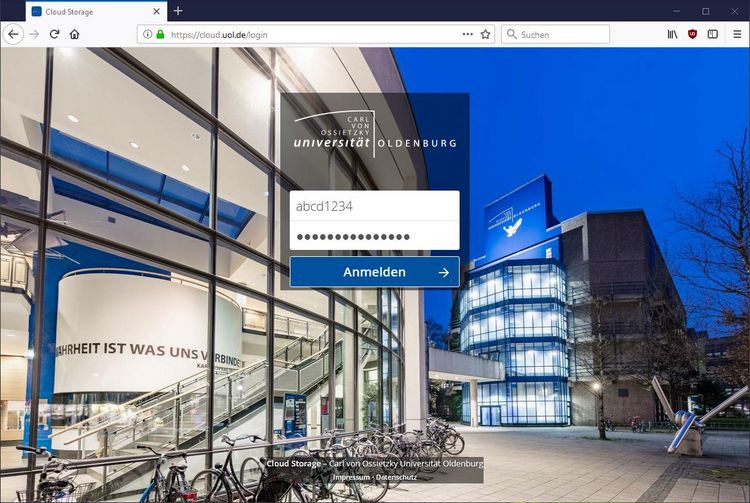
Registration

The web interface can be reached at https://cloud.uol.de .

Registration takes place with your user account.
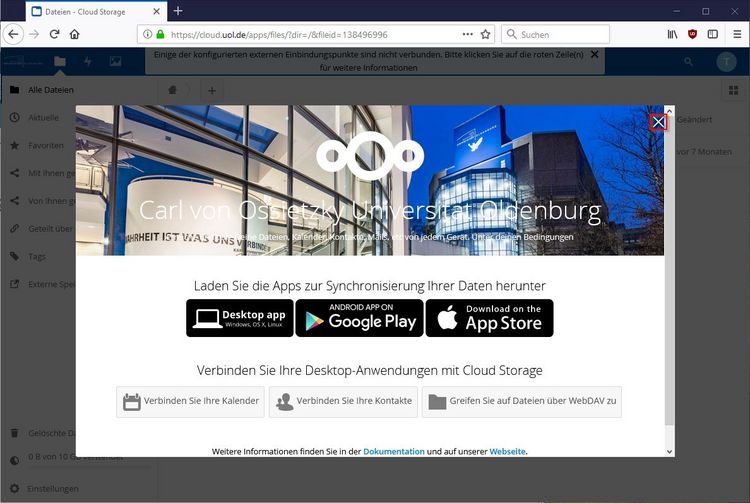
After the first login, the ownCloud web interface welcomes you with download links to the sync clients.

Confirm the welcome message by clicking on the cross at the top right.
Accessing files

You are in the overview of files and folders.

Clicking on a file name usually triggers the download of this file. Clicking on the name of a folder changes to that folder.

By ticking the box at the beginning of a line, several files can be selected and downloaded or deleted together.

About the symbol the share function for a folder or a file can be called up.
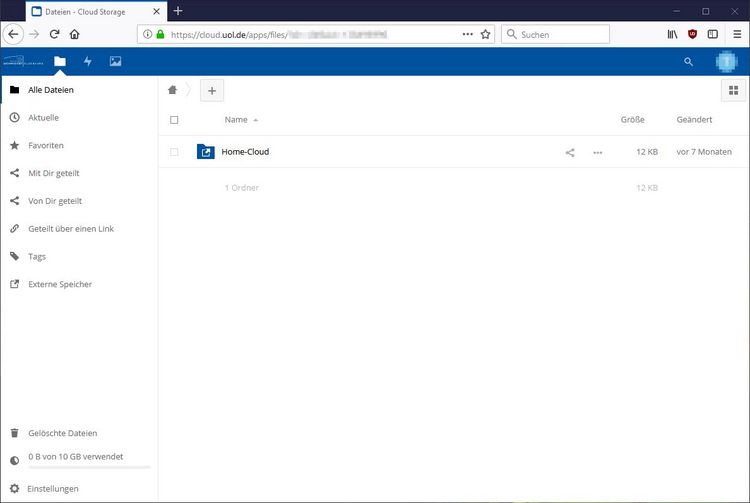
A click on leads to the context menu of a file or folder. The content of the context menu differs between folders and files. Different options are also possible between different file types.

Create a folder

With the point + new folders or files can be created or uploaded.

Upload

Click on the symbol opens a dialog for uploading new files.

You can also upload files by dragging them onto the Cloud-Storage web interface ("Drag & Drop"). Modern browsers also support uploads of directories and their content.

Delete

Files or folders can be deleted using the icon below .

You can also delete multiple files or folders by marking them with a tick and then selecting "Delete "in the column heading.

Editing of documents, tables and presentations

Cloud-Storage allows you to edit documents, spreadsheets and presentations directly in the web browser. Simultaneous editing with several people is also possible.

Share

You can share files or directories via button with other users.

There are three different ways that data can be shared with other people:

  • null direct sharing with members of the University of Oldenburg
  •   Share using Federated Cloud ID
  • null Share via link in an email with external users

When using the share function, pay attention to the symbols that appear at the end of the respective line. This indicates the type of sharing used.

Direct sharing with members of the University of Oldenburg null

Directly shared files or folders are displayed in the cloud area of ​​the selected users. Files or folders that are shared in this way can be edited directly by the selected users within the scope of the assigned authorizations.

Start typing someone’s email address in the Name, Federated Cloud ID, Email ... field. If the input is known to the system, a list of suggestions will be displayed after a few moments. A few characters of the first name are often sufficient. Use the system's suggestion list without hesitation, because the system only knows the user's primary email address. Entering an alias email address, for example with the ending ... @ uol.de , leads inevitably to the sending of a link instead of the desired direct sharing. After entering the @ - plus another character, the system suggests sharing using a Federated Cloud ID or email. As long as no @ sign has been entered, the system searches the internal user database and the content is shared directly with the users.

If no suitable proposal is made, the user account you are looking for may not have been activated for the service. Please speak to the person and refer to the necessary activation of the user account.
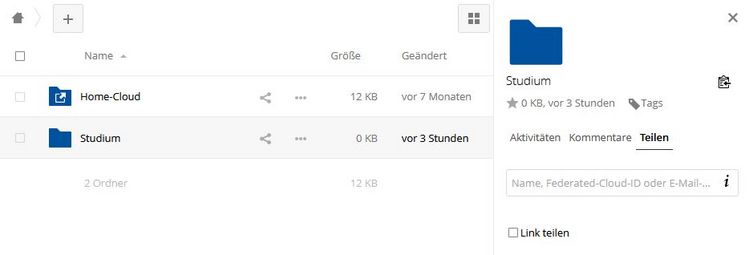
If the added university user is also allowed to upload files to your directory, move the mouse pointer over their email address and check the box "can edit".

To the right of "can edit" is an arrow pointing downwards. This opens up further options for assigning rights. You can specify here whether the user can update or delete this file. At this point, shared folders still offer the option to create . It is also possible to set an expiry date for this share for each participant.

With " Revoke approval "access can be withdrawn again for individual users.

Share using Federated Cloud ID

With a Federated Cloud ID, you can share data with users of other cloud devices that support this protocol. The software Nextcloud or ownCloud is usually also used in the other instances. In order to be able to share data with other people via this function, the person must provide you with their specific Federated Cloud ID.

Share via link in an email with external users null

If the user is not a member of the University of Oldenburg, you can share files and folders using the "Share via a link" function. First check the box here.

The link via which the file can later be accessed is initially displayed in the field below "Share via a link". You can copy this link and paste it into an individual email.

The "read-only" option only allows the visitor of the link to download the shared files and directories.

The option "Allow uploading and editing" is only available for directories shared by link. Here you allow other users to upload files to your folder. If necessary, you can assign the "Edit" right for files.

The option "Store files (upload only)" for folders shared via link allows you to only receive files via the link. Link users cannot see the contents of the folder.

With the "Password protection" option, you can define a password that must be entered before using the link.

You can set an expiration date until when the release can be used by the added users.

Shared folders of other people

Folders that other people have shared with you usually appear at the top level in your area.

Recover deleted files

The "Deleted files" button provides a recycle bin function for files. All files that you have deleted are moved here.

This trash is self-managing. As soon as the volume of the files you have deleted reaches 50% of your storage limit, the oldest files in the trash are automatically deleted.

Files are also automatically deleted when your storage space runs out.

After a retention period of 30 days, files from this recycle bin are also automatically deleted.

Activity

Under the menu item "Activities" you will find a change history about your Cloud-Storage. For example, you can see when you edited which files.

pictures

Images uploaded to Cloud-Storage are summarized under the item "Images". In the full view, a slide show can be started by clicking the arrow at the bottom right.

Settings

Clicking on your email address in the top right corner opens a dialog with the functions "Settings", "Help" and "Unsubscribe".
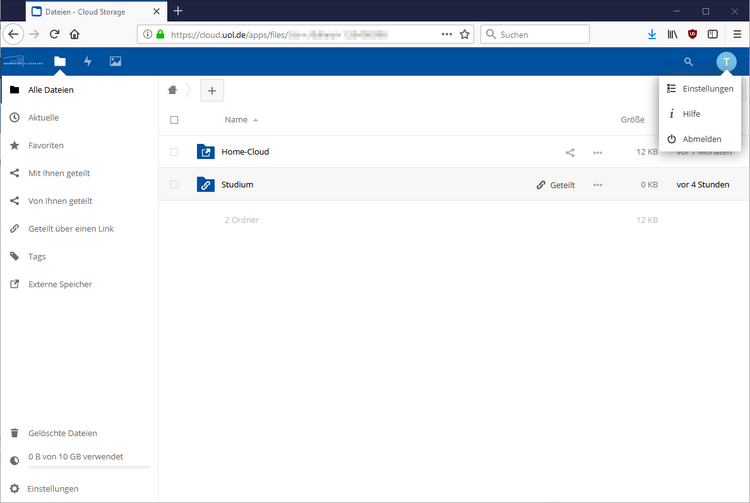
Personal information

Here you will first find an overview of the used storage space. You can personalize the service with your own profile picture. Your profile picture appears under the "Activity" and "Documents" items.

Security

Here you can see the current sessions of your user account. You can also assign app passwords. App passwords are randomly generated passwords that you can save together with your user name in other applications, e.g. the sync client on the desktop PC or the app on the smartphone. This means that these other applications do not have your real password.
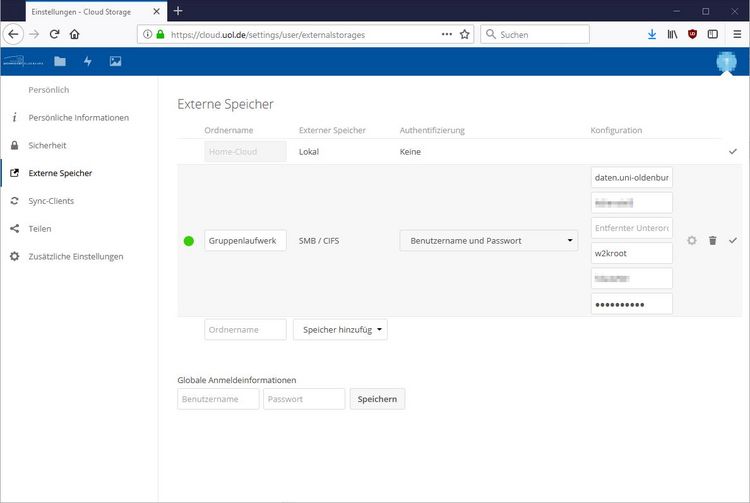
 

External storage

Additional data storage can be integrated into Cloud-Storage service under "External storage". The procedure for integrating external storage is described on the page Integrate group drive, HPC storage or L drive .

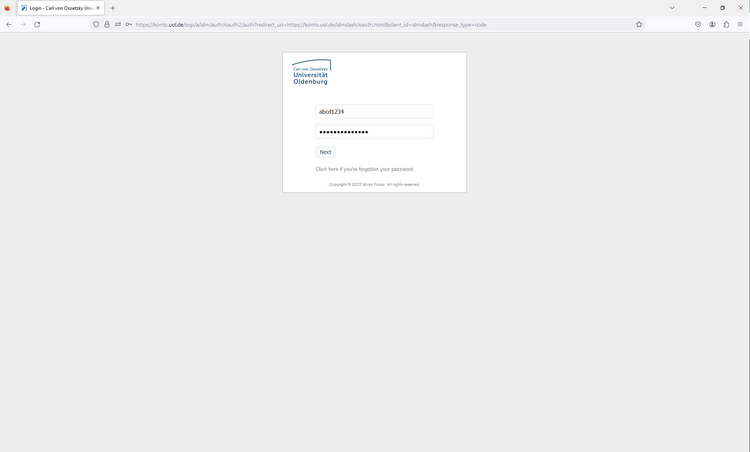
Connections to and from cloud storage

Home drive - connection between Cloud-Storage of your L drive

A folder is predefined on your home drive under L:\Cloud. This folder appears as "Home-Cloud" in your Cloud-Storage.

You can store files under L:\Cloud and share them with other people via Cloud-Storage. Uploading via the website or the sync client is not necessary.

Integrate group share, HPC storage or L-drive

You can integrate the group drive, HPC storage or the L drive that you use in the university into your cloud storage and, for example, access this data on business trips or share data directly with other people.

The integration of group drives, the HPC memory or the L drive basically follows the same steps.

To integrate, proceed as follows:

  • Open the settings for external storage in cloud storage (or click on your symbol in right top corner, select settings and select external storage).
  • Enter a folder name under which the external storage is to be integrated.
  • Under Add storage, select SMB / CIFS .
  • In the Authentication column, select the Username and Password option.

Group drive

You integrate a group drive as follows:
The fictitious group drive under \\daten.uni-oldenburg.de\agexample$ is used for this example.

  • Enter daten.uni-oldenburg.de in the Host field. (This specification can differ if another storage system is to be accessed.)
  • Enter axexample$ in the Share field.
  • You can use the "Removed subfolder" field to mount a subfolder instead of the entire group drive. Example subfolder "Research" or "Research / Field1"

HPC storage

  • Enter smb.uni-oldenburg.de in the Host field.
  • Enter data in the Share field.
  • You can use the "Removed subfolder" field to mount a subfolder instead of the entire group drive. Example subfolder "Research" or "Research/Field1"

L-drive

  • Enter daten.uni-oldenburg.de in the Host field.
  • Enter home in the Share field.
  • Use the "Removed subfolder" field to integrate a subfolder instead of the entire group drive: enter your user name and, if necessary, a subfolder separated by /. Example " abcd1234 " or " abcd1234 / Documents"

Same settings for every example

  • Enter w2kroot in the Domain field.
  • Enter your user name in the User name field. Example: abcd1234 .
  • Enter your password associated with the user name in the Password field.
  • Click on the gear icon and tick the checkbox for share if you want to share data from the integrated memory with other people.

This completes the integration of a group drive. You can return to the file view by clicking on the Uni logo at the top left.

Please remember to update the new password here for the group drives after changing your password.

Sync-Client: synchronize with desktop computer

Sync clients automatically synchronize a folder on the working device with the online storage of the cloud storage service.

Addresses

You can obtain sync clients for the operating systems Windows, MacOS X and many Linux distributions at https://nextcloud.com/install/#install-clients (or here from the university network).

The server address for all sync clients is https://cloud.uol.de .

Windows

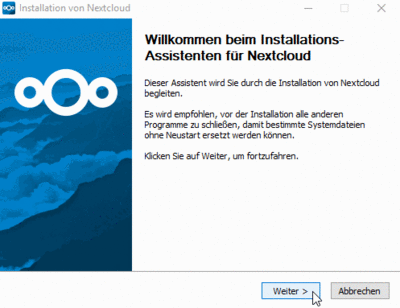
After you have obtained the sync client from nextcloud.com/install/#install-clients (or here from the university network), start the installation.


Now the configuration of the sync client follows.

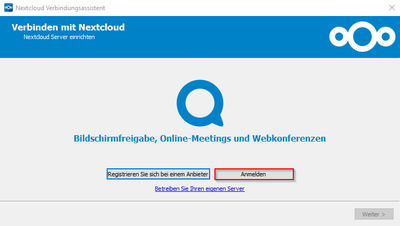
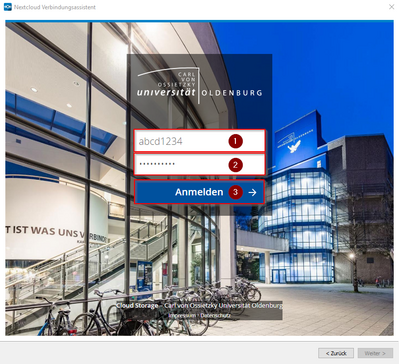
Select "Sign in".

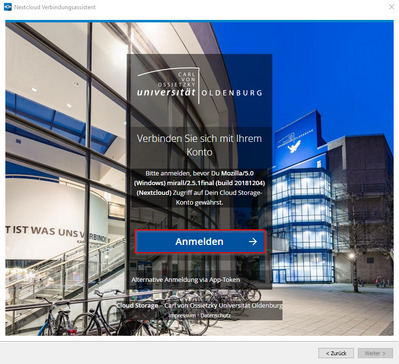
First set the server address cloud.uol.de.

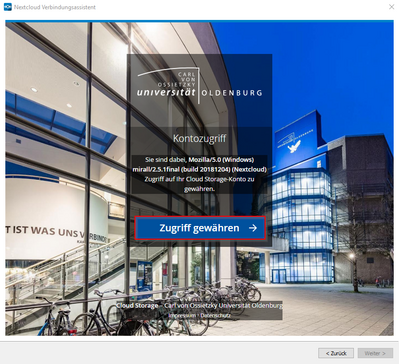
Enter your login details.

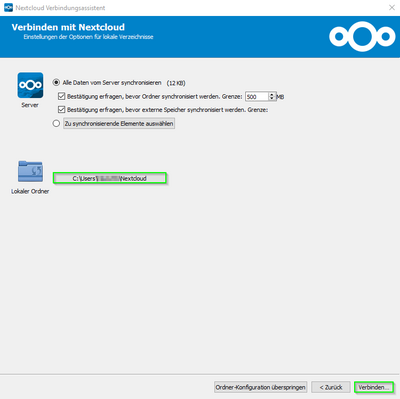
You can now select a local folder that is to be synchronized with the online service Cloud Storage.

Warning: Do not use the L: \ Cloud folder as the destination for the sync client. This folder is already part of your cloud.

From now on, the sync client does its work in the background and synchronizes the directory you specified with the online memory.

MacOS X

Start ownCloud.dmg, enter the server address cloud.uol.de and your personal access data and select a local folder for the synchronization. The setup corresponds to that under Windows.

Linux

Here you will find information on installing the Nextcloud sync client under different distributions

Fedora

The client for Nextcloud is already included in the Fedora package sources. You install this package with the command "dnf install nextcloud-client-nautilus". Then start the "nextcloud" program.

The setup of the client corresponds to that under Windows.

Red Hat Enterprise Linux

The sync client is included in the package sources of the Red Hat Desktop of IT services. You install it with the command "yum install nextcloud-client-nautilus".

The setup of the client corresponds to that under Windows.

WebDAV

You can also access your data storage via WebDAV. The URL is as follows:

cloud.uol.de/remote.php/webdav/

Integrate Cloud-Storage into the Stud.IP

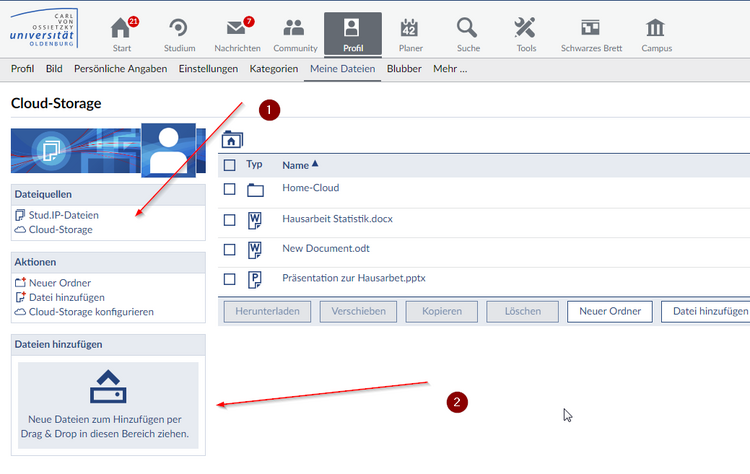
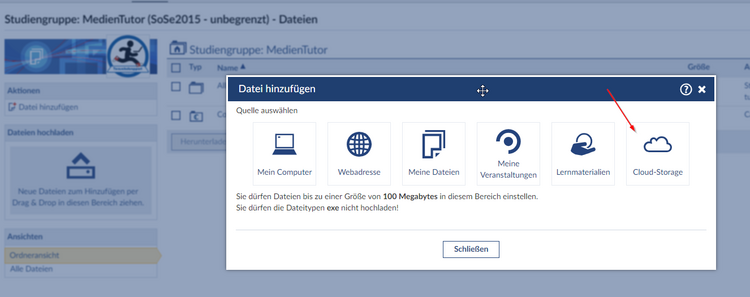
In Stud.IP you can integrate the cloud storage directly into your file area.

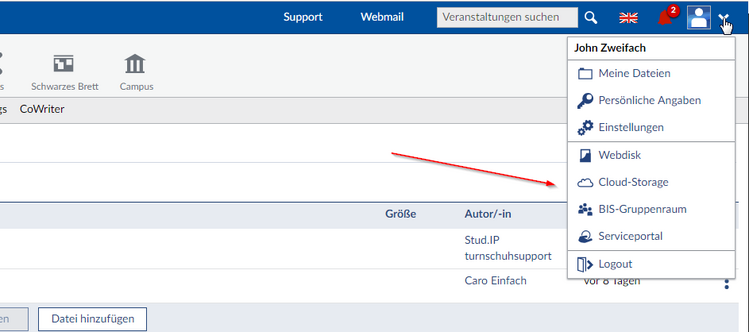
To do this, go to the "My files" tab in Stud.IP under the "Profile" menu item and select "Configure Cloud-Storage" in the navigation on the left. Then confirm the activation here.

You will then find Cloud-Storage in a separate area.

You can now add files directly from Cloud-Storage to your events or study groups in the file area.

The functions for sharing and simultaneous editing of Word, Excel or PowerPoint files are only available if you open the cloud storage directly either via c.uol.de or from Stud.IP.

Integrate cloud storage into file manager

Cloud-Storage can be integrated directly into the file manager of the operating system using the WebDAV protocol.

Many operating systems offer direct support for WebDAV. For some, programs or apps have to be installed.

All you need from Cloud-Storage to use WebDAV are your login details and the URL cloud.uol.de/remote.php/webdav.

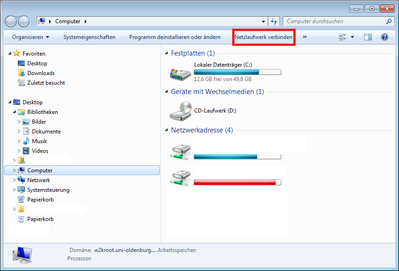
The following section shows the integration into Windows 7 Explorer.

First start the Windows service "WebClient". You need administrator rights to carry it out.

  • To do this, click under the Windows logo ("Start menu") with the right mouse button on "Computer" and select "Manage" here.
  • Go to "Services" under "Services and Applications".
  • Open the "WebClient" service in the middle column by double-clicking.
  • Change the "Startup Type" setting to "Automatic".
  • Start the service immediately with "Start".
  • Confirm with OK and close the computer management.

1. Open the "Add network drive" dialog in Windows Explorer:


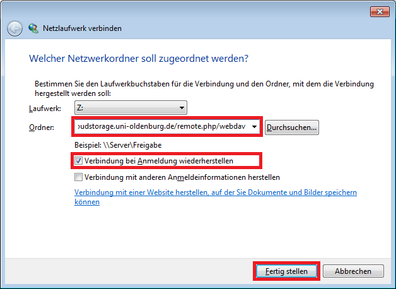
2. Enter the address cloud.uol.de/remote.php/webdav as the folder. You can also choose whether the connection is to be re-established the next time you log in or under which drive letter your cloud storage is to be displayed. Confirm this dialog with "Finish".


3. A new window appears for entering your access data. You can instruct Windows that your access data should be saved. Confirm with OK".


You should now have access to the contents of your cloud storage.

Example applications and ideas for the use of Cloud-Storage

In this section you will find application examples for cloud storage .

Cloud storage instead of attachments to emails

Sharing files through cloud storage instead of attachments to email offers you the following benefits:

  • The files are encrypted here.
  • You can transfer larger amounts of data.
  • You can update the data afterwards without having to send it again by email.
  • They relieve your e-mail inbox as well as the recipient's mailbox.
  • Files are not held back by SPAM filters.

Here's how to do it:

  • If necessary, create a new folder in your cloud storage.
  • Place the files to be distributed in this folder.
  • Share the folder using the "share as link" function.
    • If necessary, assign a password to access this folder.
    • If necessary, assign an expiry date for access to this folder.
    • Allow public upload if you want to receive files.
  • Copy the automatically created link to the clipboard and paste it into an email to the desired group of recipients.

Smartphone and Tablet apps

In the Apple and Google app stores you will find an app for synchronizing data between mobile devices and Cloud-Storage of University of Oldenburg. Search for "Nextcloud" here.

Synchronise bookmarks in the browser with the Nextcloud

The "Bookmarks" app installed in Nextcloud allows you to save links to websites, so-called bookmarks/favourites, in your personal Nextcloud account. With the Floccus browser extension, it is also possible to synchronise the saved bookmarks from your browser with your Nextcloud account. You can find out exactly how to set this up in these instructions.

Service Desk (Changed: 06 Aug 2024)  | 
Zum Seitananfang scrollen Scroll to the top of the page